Scaling SignalR with Redis
This is a fifth contribution in a series dedicated to SignalR. The previous article looked at dependency injection.
SignalR was built with scalability in mind. Even though you will be able to run a fair number of concurrent connections on a single server instance, there will come a point where a single node will not be able to handle the load. The maximum threshold of concurrent connections per node depends on quite a few factors such as server spec, client transport type or the amount of work alongside message processing.
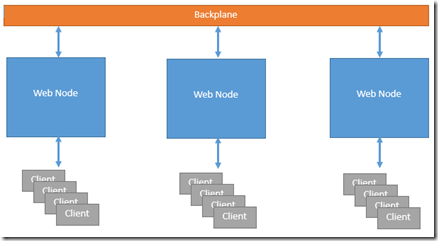
The solution is to increase the number of server nodes and run SignalR over load balancer or in web-garden. However, these separate instances will need to pass data between each other to ensure every client gets the same data. This is done through a backplane.

SignalR will support one of the following backplanes to pass messages between the web nodes: Service Bus, Redis and SQL Server. This article will look at implementing Redis as the backplane. However, you can also use the Service Bus for Windows Server that just went 1.0 and the SignalR team are also promising an SQL backplane implementation soon.
Running Redis on Windows
Redis is an in-memory key-value store that persists the data to the disc from time-to-time. It is the in-memory element that gives Redis the amazing performance. It was written in ANSI C and therefore works well on Linux or OSX. However, you can now run it on Windows using the MSOpenTech redis port. I’m not 100% sure if it is fit for production, but for local dev with Redis it is more than good.
Getting up and running with Redis from MS OpenTech
You can start by cloning the repository from https://github.com/MSOpenTech/redis and building the solution from /msvs/RedisServer.sln. It is written in C++ so you should be able to build it in Visual Studio in Release mode and pick up resulting files from /msvs/Release/.
You can then copy the Release files to your desired directory, for example C:\Redis\bin\ and copy the redis.conf configuration file to the same directory (from the root of the repository).
Run the Redis Server locally
Once you have your redis server built and the config file in place, you can open up C:\Redis\bin\ folder in command prompt and run:
1redis-server.exe C:\redis\bin\redis.confThe server will start up and give you a heart-beat ever five seconds with the number of connected clients. It’s very important that you specify the config file. If you don’t redis will use the default config and SignalR will not be able use the queues.
Now that you’ve got the redis server running, you can connect with your clients. To test your redis server, you can connect with a console client. Open up another command prompt, navigate to C:\Redis\bin\ and type in
1redis-cli -h localhost -p 6379You should get a successful connect message redis localhost:6379>
If you are not after a local Redis server on Windows, you can get a free instance from http://redistogo.com/ to test things out.
Wire Up SignalR and Redis
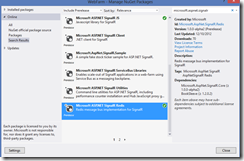
Wiring up SignalR and Redis is really, really simple and takes only two steps. First of all you should pull down the Microsoft Asp.Net SignalR Redis package. It will pull down various dependencies, including BookSleeve library that looks after the communication with Redis.

Then, you could call UseRedis extension method on SignalR DependencyResolver to register Redis as your backplane in your global.asax.
1//... your existing code
2
3RouteTable.Routes.MapConnection<DistributedConnection>("echo", "echo/{*operation}");
4GlobalHost.DependencyResolver.UseRedis("localhost", 6379, "", new [] {"signalr.key"});
You can push the setting to your web.config and use a settings class instead of hard-coding them. Since I’m running the server locally, I use “localhost” as my host, the default 6379 port and I pass in an empty string as my authentication pass. Also, you have to specify event key name. You change the port number and password by editing the redis.conf file.
Testing it all locally
Testing it all locally can be a bit tricky. The best thing to do is to test it in full IIS with web-garden. You should set up your local app as you normally would and then increase the number of web-processes. You will find the setting in your App Pools –> Select your app pool and Click on Advanced Settings –> Set the Maximum Number Of Worker Processes to higher than 1. (I’ve set it up to 10 just to be sure).

When you spin up few web-clients, you should see the number of worker processes rising for your app pool. You should also see the number of clients rising on your local Redis server. When you broadcast the message over SignalR, it should get delivered to all worker processes. Simple!
If you have any questions, give me a shout @mirajavora
Related Links
Redis Documentation http://redis.io/documentation Free Redis Instance http://redistogo.com/ MS Open Tech Windows Redis Port https://github.com/MSOpenTech/redis
Related Articles
SignalR – Introduction To SignalR SignalR – Publish Data Using IHubContext SignalR – Publish Data Using Proxies SignalR – Dependency Injection
